
 Every year at the holidays I like to make a gingerbread house. There's something about creating art with food that's more interesting than inedible art - the charm of it, the magic of how the physical properties of the food make it even possible. Because it's interesting, I'm able to do it (in general I'm not too good at crafts).
For the past few years I haven't done one - lazy, busy, unsure how to go about it, whatever. This year I decided to go for it and make one more elaborate than I've one before. It was quite a project and kept me occupied for the holiday week when I had resolved not to touch my work email. Here is a picture of the results (it links to a larger version).
The thing about gingerbread houses is, I haven't found excellent instructions for making them. I've read a few books but they were pretty basic, even after skipping over the ones that mostly have you using a preformed kit. You see amazing gingerbread houses in contests sometimes, but I haven't been able to uncover books that really explain how those people learned their craft. Perhaps the sorts of people who are good at gingerbreading aren't the sorts of people who write books, or maybe publishers don't think there's a market for advanced instructions. Maybe you really need to be a master pastry chef to do advanced projects, at which point you don't need instructions.
Although in the end the house came out pretty nifty, I definitely made lots of mistakes along the way. But I really learned from those mistakes. I thought I'd record some of what I learned, for my own future use and for other people hunting around for advice on gingerbreading. I certainly benefited from other peoples' blog articles about their own experiences while I was working on mine.
Design
In the past, I've just drawn out a design on paper and cut it out. But the minute you go beyond the simple box shape house, it gets complicated. I like things like dormer windows, but when you have two angled roofs meeting each other, the trigonometry starts to get complicated. While I can figure it out, high school math was a long time ago.
However, it's a different world then when I was in high school. There are now 3D design software tools that do all the math for you. When I started looking around, I found a lot of products that are specifically oriented at home design. Some of these are "light" versions of professional architectural tools, and some are available for free. A lot are focused on things like designing your kitchen, but some allow you to do an entire building design.
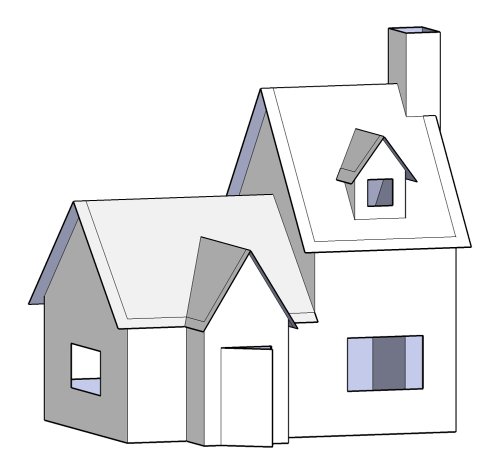
In the end I used Sketchup to do the design (I also considered trying the "lite" version of DesignWorkshop but had already invested a lot in the Sketchup model). I learned the program and came up with a design in one day. While the tool normally wants to do designs on the scale of real houses with measurements in feet, I zoomed the environment and did my design at "actual size" with measurements in inches. An image of what the design looked like in the program is shown left.
The bigger challenge turned out to be coming up with the pattern pieces. Although I had a design, the pieces I would need existed in a 3D relationship to each other, and I the software didn't provide an easy mechanism to separate them. I ended up copying all the faces, pasting them beside the house, rotating them all into a single plane, and then arranging them into templates the size of my printer paper. To save paper I only included one copy of identical faces, but needed to be sure to remember how many of each pattern to cut, and whether they needed to be in a mirror relationship to each other. It seems to me making this process easier would be an excellent candidate for a "gingerbreading plugin" to some 3D design tool.
One challenge that may be somewhat unique to gingerbread architecture may be the expansion during baking. Pieces that fit together on paper may not after the cookies are baked, particularly when you account for the extra space on edges taken up by the icing glue. Sometimes, it's not really a problem - a square box will just be a slightly bigger square box. But when pieces come together in complicated ways, there may be spots where there's a little too much cookie in the way. So on edges that will join against other parts of the house, allow for expansion by trimming about 1/8 inch off the pattern. I didn't do that and mostly got away with it, but there were places I had to fudge things.
I learned a little bit about what real architects have to consider as well. For this house, I just designed an exterior that looked nice. But I think it would have been a more realistic-looking house if I had considered the hypothetical interior layout more. For instance, half the house has a second story, but the apparent height of the second story doesn't jibe with what the first story establishes. A gingerbread house isn't a real house, it's a work of art, but if the design starts out realistic and then is poetically exaggerated, I think it works better than if it's just thrown together without awareness of the underlying representation.
When real houses are built, they have to be designed not just for their final form, but with awareness of the process of construction. You can't put the roof on before the walls are up, and if the walls require the roof to stabilize them, you've got a problem. You have to leave room for any scaffolding, and a way to remove the scaffolding when the construction is complete. I ended up with a piece that needed to be suspended in midair while the icing set. I held it up with spice jars but it wasn't stable, and I needed to be able to remove the jars at the end. Fortunately I had decided not to glue the house to a base, so I could just lift it up (and hope it didn't break), but that piece could have broken the entire design.
Baking
Baking a gingerbread house is well covered in books and pretty straightforward. Make gingerbread dough, roll it out, cut out the patterns, bake, and cool. The tricks to baking are all about making sure the pieces are as true to the original pattern as possible.
The gingerbread recipe involves making a dough that is warm. Keep it that way, it won't roll out smoothly when it cools. It can be rewarmed, but but careful not to accidentally cook it in the process. I found also that it is ok to knead the dough, which keeps the temperature even and possibly builds strength. (Warnings about making cookies tough by kneading don't apply to gingerbread where the object is stability, and anyway it's not as much of a problem in a crispy cookie.)
Gingerbread dough must be rolled out directly on the cookie sheet, which means using a rimless sheet or rolling on parchment paper. Transferring rolled out dough will inevitably stretch it, distorting the shape. The dough also must be rolled out evenly. Variations in thickness lead to variations in how much the edges spread, resulting in non-straight edges that are difficult to match up. I also found that 1/8 inch is an optimal thickeness, which is pretty thin. It's still plenty strong, easier to tell if the thickness is even, and easier to keep in place during construction than thicker, heavier pieces.
Don't forget to leave space between the cutouts on the sheet, at least 1/2 inch and ideally an inch. Place the cutouts over the dough, cut around them, and lift the surrounding dough scraps away once all the cutouts for that sheet have been made. A ruler and pastry wheel can help make even cuts, but be careful not to touch the surface - dimples may cause thickness variations and any surface marring will be visible after baking. Cut corners carefully so the dough doesn't stretch them when lifted away. My paper pattern pieces absorbed a lot of grease just in brief casual contact; use a more solid material if you plan to use them for more than one house.
Some of my pattern pieces were intended to make more than one piece of the house, and some of those needed to be mirror images (to get left and right sides of a part). The mirror image cutout is important because only the top side during baking looks good on the house. I had marked on my cutouts which ones needed more than one piece, and which ones needed to be mirror images, but in the excitement of it all I often forgot, and ended up with a few pieces that weren't quite right. Be careful to mark the pieces and keep track that all the needed pieces have been correctly made.
Bake pieces for about 15 minutes. They will still be soft but will harden when cool. Let them cool on a rack, but again be careful not to distort them during movement. If there are obvious flaws, they can be trimmed away while the dough is still warm, though this should only be done where the marks will be covered by icing.
Construction
Gingerbread houses are glued together with Royal Icing. I have taken the advice to make the icing with meringue powder instead of egg whites, because it is supposed to be more stable, can be rebeaten if it looses its oomph, and has less food safety worries. It dries out quickly; keep portions not in use well covered, and even cover the decorating tip when not using the pastry bag.
Assemble as many pieces of the house as feasible in one go. The icing takes about 4 hours to dry enough that it can be gently disturbed by further work on the house, and 12 hours before it's strong enough to move the house around. Do not disturb it during the first four hours, I found that breaks the solidifying structure and it has to be reglued.
Prop pieces to be assembled with spice jars or other implements. Pipe icing along the edge of one face to be joined, then attach the other face, sinking both edges well into the piping. Make sure there are no gaps. Assemble the main box of the house, and any other parts that can be assembled. After they have set up, they can be joined to the whole. Be especially careful when attaching the roof that it will not slide while the icing sets.
The icing will maintain its texture for several hours. However, with this house it took at three separate gluings to assemble. Rebeat the icing to restore its glossy glue-like texture.
Decorating
Points to remember
- Create a checklist to help do things in order. I forgot to do my sugar windows before starting to glue the house together, and then it was too late.
- As architects and engineers must, design house with attention to the exigencies of construction. The house can't just be stable in its final form, it needs to be stable in the stages of constuction. Pieces that will be temporarily unsupported will be difficult to put in place unless an effective jig is available. Spice jars are useful for basic propping up of walls but may not serve for more elaborate needs.
- For a more realistic house, design the interior layout even if it won't be represented in the final house. That way the exterior architecture will make sense. Of course, for a fantasy house this isn't strictly necessary if apparent function isn't the goal, but apparent function will help sell the model.
- When the icing is fresh it is pliable and an effective glue. When it is dry, it is like a mortar forming a strong bond. However, during the drying process it is too dry to be pliable and too wet to be strong. During this time the bond is easily broken if the house is disturbed and it will be necessary to reglue. It is best to let structural icing joins dry for 8 hours before proceeding with any activity that may disturb the joins.
Sample checklist
- Design house.
- Split design into faces.
- Correct design of faces to allow for expansion of glued edges, where this expansion might throw off the proportions.
- For complicated designs, make a plan to assemble house in successive stages.
- For complicated designs, draw a "foundation" template to help lay out the walls correctly.
- Cut out templates. Label parts, indicate number to make, and indicate when duplicates must be flipped to make mirror images.
- Make gingerbread dough and roll out.
- Lay out pieces, ensuring that mirror images are properly mirrored.
- Cut and bake gingerbread pieces.
- Trim uneven edges while hot.
- Make sugar windows and pour into window openings, with a piece of aluminum foil underneath.
- Make Royal Icing and fill pastry bag.
- Glue together pieces, making sure joins are secure and layout is not askew. Follow plan for assembly.
- Using softened icing, flat-ice any surfaces, e.g., snow on roof, and apply any decorations.
- Using regular icing, apply candy decorations at will.
- Using regular icing, apply decorative trim to edges of roofs, window openings, glued joins, etc.
- Using softened icing, apply icicles to roof eves if desired.
Comments